How To Create A Pos System In Excel
 How To Create A Pos System In Excel
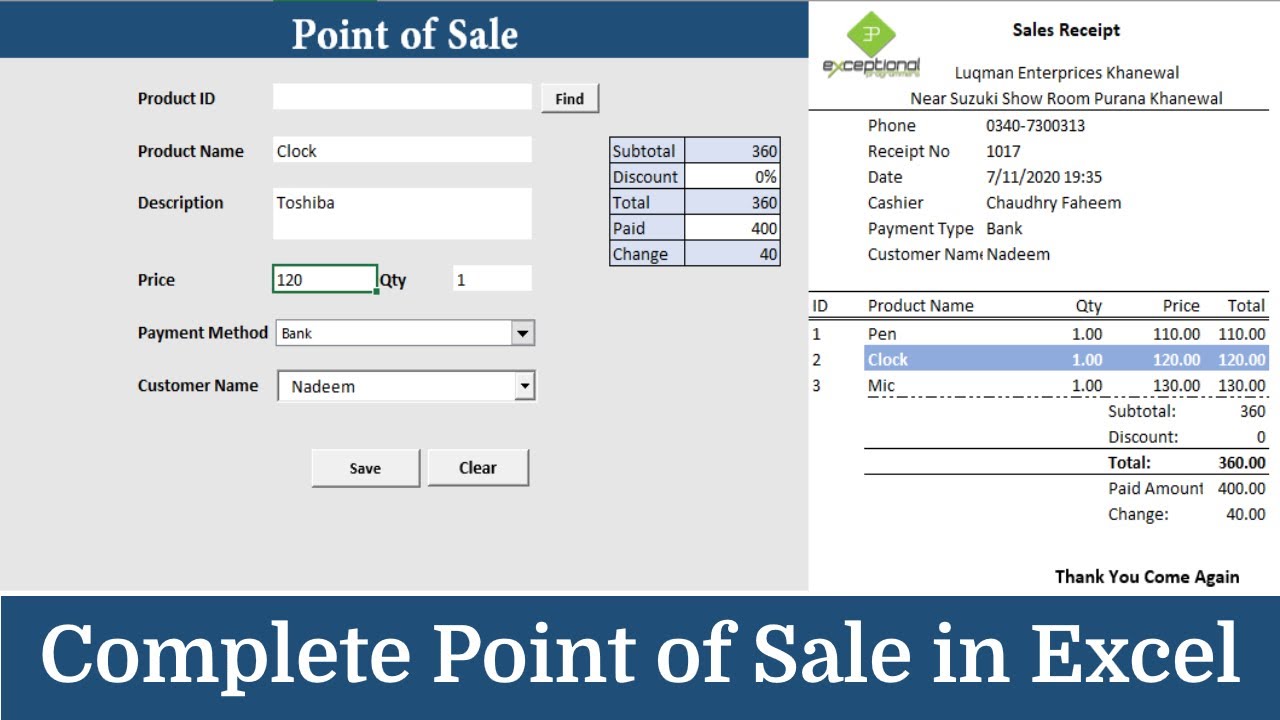
 Creating a Point of Sale System in Excel can be the perfect solution for many businesses who want an affordable solution to managing their inventory and tracking customer sales. From small businesses to large companies, a POS system can provide an easy way to keep track of customer orders, process payments, and manage inventory while saving time and money. In this tutorial, we will show you how to create a POS system in Excel that is easy to use and can grow as your business expands.
Step 1: Set up your Database
The first step in creating a POS system in Excel is to set up your database. This will involve creating an inventory list and customer sales records. Make sure to label each column with the right titles. Use standard drop-down menus for items, prices, and categories. Once this is done, it is time to set up customer data fields. This information will be used to track customers’ purchases, store credit cards, and other important information.
A POS system in Excel should also include an “Order” tab, where users can enter in orders and add new products. This tab should contain columns for item name, quantity, and price. Finally, it is a good idea to have a “Totals” tab, which allows users to quickly see a total for the entire order. This way, users can easily determine how much should be charged before submitting the order.
Step 2: Integrate Payment Processing
Once the database is set up, the next step is to integrate payment processing. Excel allows you to create a drop-down menu of payment methods, including credit and debit cards, PayPal, and other forms of payment. Once the payment gateway is chosen, you can display the payment total, including taxes and shipping fees.
Integrating payment processing also allows customers to easily save their payment information for future orders. This information is kept secure in an encrypted database that can only be accessed by an authorized user.
Step 3: Add in Reporting
Reporting is an important part of any POS system, and Excel can make it easy to quickly generate reports. Use the Excel formula feature to quickly generate reports on customer purchase history, inventory levels, sales trends, and more. Excel also makes it easy to generate invoices quickly and automatically.
Step 4: Create Bar Codes and Labels
Creating bar codes and labels is a great way to make tracking inventory easier. Excel can be used to easily generate bar codes with unique serial numbers and item information. Once the bar codes are generated, they can be printed onto labels that can be used to easily scan and track inventory.
Step 5: Export Reports to Other Software
Once the POS system is complete, it is time to export the data to other software applications. Excel allows you to easily export reports to other popular software applications, such as QuickBooks and Sage. These reports can be used to track sales, inventory, customer information, and more.
Step 6: Stay Secure
When setting up a POS system in Excel, it is important to ensure that all customer and payment information are properly encrypted. Excel allows users to store customer information in an encrypted database to ensure that the information is secure. Additionally, it is important to use a strong password to prevent unauthorized access to the system.
Step 7: Monitor System Performance
Finally, it is important to monitor the system performance to ensure that it is running smoothly. Excel provides several tools to help users track system performance, including real-time performance reports, graphs, and more.
Creating a POS system in Excel can be a great solution for businesses looking for an affordable and easy to use solution. With a few simple steps, businesses can quickly set up an efficient and secure system that will save time and money.
Post a Comment for "How To Create A Pos System In Excel"